Tampilkan postingan dengan label html. Tampilkan semua postingan
Sabtu, 27 November 2010
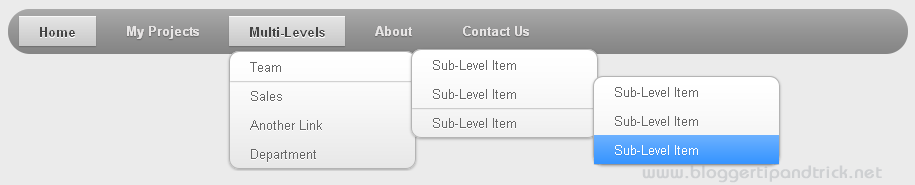
30+ Pure CSS Horizontal Menus Tutorials
The navigation menu of a website is very important for that website. It gives more attraction your website or blog.Also it will very useful to navigate through your website very easily without confusing.So every web master should give special attention for the top navigation menu of their websites.
Here I listed below some of best CSS horizontal menu collection with full configuration tutorials for your easy use.You can choose any menu from the list given below and go directly to the article links for the setup instructions.All of these Horizontal Menus working perfectly only using CSS and sometimes images with CSS.(JavaScript is not used by any menu given here)So you don't want to worry about JavaScript disabled browsers.
If there is any menu CSS you like from the list given below,but you can not add it to your website or blog yourself,you can contact me,I can do it for you.
Advanced CSS Menu

Demo : http://www.webdesignerwall.com/demo/advanced-css-menu/
Article : http://www.webdesignerwall.com/tutorials/advanced-css-menu/
Download : http://www.webdesignerwall.com/file/advanced-css-menu.zip
Bulletproof CSS Sliding Doors

Demo : http://azadcreative.com/files/Bulletproof.zip
Article : http://azadcreative.com/2009/03/bulletproof-css-sliding-doors/
Download : http://azadcreative.com/files/BulletproofSlidingDoors.psd.zip
Create a Slick Menu using CSS3

Demo : http://insicdesigns.com/demo/css3/exp2/index.html
Article : http://blog.insicdesigns.com/2010/02/create-a-slick-menu-using-css3/
Download : No
How to Make a CSS Sprite Powered Menu

Demo : http://s3.amazonaws.com/buildinternet/live-tutorials/css-sprite-menu/css-sprites-nav.html
Article : http://buildinternet.com/2010/01/how-to-make-a-css-sprite-powered-menu/
Download : http://s3.amazonaws.com/buildinternet/live-tutorials/css-sprite-menu/css-sprites-nav.zip
CSS Express Drop-Down Menus

Demo : http://www.projectseven.com/tutorials/navigation/auto_hide/workpage.htm
Article : http://www.projectseven.com/tutorials/navigation/auto_hide/
Download : http://www.projectseven.com/tutorials/navigation/auto_hide/p7exp.zip
CSS3-only horizontal drop line tab menu

Demo : http://www.skyrocketlabs.com/categories/tutorials/css3-only-horizontal-dropline-tab-menu/demo/index.html
Article : http://www.skyrocketlabs.com/articles/css3-only-horizontal-dropline-tab-menu.php
Download : http://www.skyrocketlabs.com/categories/tutorials/css3-only-horizontal-dropline-tab-menu/css3-only-horizontal-dropline-tab-menu.zip
Nicer Navigation with CSS Transitions

Demo : http://www.gethifi.com/blog/nicer-navigation-with-css-transitions
Article : http://www.gethifi.com/blog/nicer-navigation-with-css-transitions
Download : No
Pure CSS Horizontal Menu

Demo : http://devinrolsen.com/wp-content/themes/typebased/demos/css/css-horizontal-menu/WORKS.php
Article : http://www.devinrolsen.com/pure-css-horizontal-menu/
Download : No
DropDown CSS Menu

Demo : http://divitodesign.com/dd-articles/horizontal-css-menu/index.html
Article : http://divitodesign.com/css/how-to-dropdown-css-menu/
Download : http://www.divitodesign.com/dd-articles/horizontal-css-menu/horizontal-css-menu.rar
Pure CSS Menu With Infinite Sub Menus Tutorial

Demo : http://www.devinrolsen.com/wp-content/themes/typebased/demos/css/infinite-sub-menu/
Article : http://www.devinrolsen.com/pure-css-menu-with-infinite-sub-menus-tutorial/
Download : No
CSS3 Dropdown Menu

Demo : http://www.webdesignerwall.com/demo/css3-dropdown-menu/
Article : http://www.webdesignerwall.com/tutorials/css3-dropdown-menu/
Download : No
Elegant Drop Menu with CSS Only

Demo : http://aext.net/example/elegant-menu-with-css-only/
Article : http://aext.net/2009/09/elegant-drop-menu-with-css-only/
Download : http://www.box.net/shared/paoqo8y1lt
CSS dropdown menu without javascripting or hacks

Demo : http://www.texaswebdevelopers.com/blog/examples/ddmenu2.asp
Article : http://www.texaswebdevelopers.com/blog/template_permalink.asp?id=129
Download : No
Create Vimeo-like top navigation

Demo : http://www.jankoatwarpspeed.com/examples/vimeo_navigation/
Article : http://www.jankoatwarpspeed.com/post/2009/01/19/Create-Vimeo-like-top-navigation.aspx
Download : http://www.jankoatwarpspeed.com/file.axd?file=2009%2f1%2fvimeo_navigation.zip
ADxMenu

Demo : http://aplus.rs/adxmenu/examples/htb/
Article : http://aplus.rs/adxmenu/
Download : http://aplus.rs/adxmenu/adxmenu-v4.zip
A Great CSS Horizontal Drop-Down Menu

Demo : http://sperling.com/examples/menuh/
Article : http://sperling.com/examples/menuh/
Download : http://sperling.com/examples/menuh/menuh.css
CSS menus

Demo : http://www.howtocreate.co.uk/tutorials/testMenu.html
Article : http://www.howtocreate.co.uk/tutorials/testMenu.html
Download : No
Pure CSS Fish Eye Menu

Demo : http://www.jampmark.com/html+css-techniques-demos/pure-css-fish-eye-menu-demo.html#expandDown
Article : http://www.jampmark.com/html+css-techniques/pure-css-fish-eye-menu.html
Download : http://www.jampmark.com/downloads/javascript-html-css-codes/pure-css-fish-eye-menu.html
A centered menu with gradient and two pointers

Demo : http://www.cssplay.co.uk/menus/two_points.html
Article : http://www.cssplay.co.uk/menus/two_points.html
Download : No
Create an Advanced CSS3 Menu

Demo : http://blog.cameronbaney.com/tutorials/cbdb-menu/demo.html
Article : http://blog.cameronbaney.com/tutorials/advanced-css3-menu/
Download : http://blog.cameronbaney.com/tutorials/cbdb-menu/cbdb-menu.zip
Solid Block Menu

Demo : http://www.dynamicdrive.com/style/csslibrary/item/solid_block_menu/
Article : http://www.dynamicdrive.com/style/csslibrary/item/solid_block_menu/
Download : http://www.dynamicdrive.com/cssexamples/media/blockdefault.gif
http://www.dynamicdrive.com/cssexamples/media/blockactive.gif
Sleek Pointer Menu

Demo : http://www.dynamicdrive.com/style/csslibrary/item/sleek-pointer-menu/
Article : http://www.dynamicdrive.com/style/csslibrary/item/sleek-pointer-menu/
Download : http://www.dynamicdrive.com/cssexamples/media/rightround.gif
http://www.dynamicdrive.com/cssexamples/media/pointer.gif
Sleek Pointer Menu 2

Demo : http://www.dynamicdrive.com/style/csslibrary/item/sleek-pointer-menu-2/
Article : http://www.dynamicdrive.com/style/csslibrary/item/sleek-pointer-menu-2/
Download : http://www.dynamicdrive.com/cssexamples/media/rightround2.gif
http://www.dynamicdrive.com/cssexamples/media/pointer.gif
How to Create a CSS Menu Using Image Sprites

Demo : http://line25.com/wp-content/uploads/2009/css-menu/demo/demo.html
Article : http://line25.com/tutorials/how-to-create-a-css-menu-using-image-sprites
Download : http://line25.com/wp-content/uploads/2009/css-menu/demo/awesome-menu.zip
CSS Sprite Navigation Tutorial

Demo : http://www.ehousestudio.com/assets/downloads/sprite/
Article : http://www.ehousestudio.com/blog/view/css_sprite_navigation_tutorial
Download : http://www.ehousestudio.com/assets/downloads/sprite.zip
CSS Overlapping Tabs Menu

Demo : http://www.tutorialsphere.com/homemade/uploads/2009/02/css-overlapping-tabs-menu.html
Article : http://www.tutorialsphere.com/homemade/2009/02/18/css-overlapping-tabs-menu
Download : http://www.tutorialsphere.com/homemade/uploads/2009/02/tabs.gif
CSS Navigation Menus

Demo : No
Article : http://www.jacorre.com/design/cssnavmenus.htm
Download : No
CSS3 Chunky Menu

Demo : http://zubeta.com/demo-menu.html
Article : http://zubeta.com/css3-menu-demo.html
Download : No
Creating a glassy non div navigation bar

Demo : http://www.james-blogs.com/wp-content/tutorials/glassy-nav-tabs/
Article : http://www.james-blogs.com/2009/01/07/creating-a-glassy-non-div-navigation-bar/
Download : http://www.james-blogs.com/wp-content/tutorials/glassy-nav-tabs/nav-tab-bg.png
Centered Tabs with CSS

Demo : http://24ways.org/examples/centered-tabs-with-css/final.html
Article : http://24ways.org/2005/centered-tabs-with-css
Download : No
Apple�s Navigation bar using only CSS

Demo : http://westciv.com/style_master/blog/apples-navigation-bar-using-only-css
Article : http://westciv.com/style_master/blog/apples-navigation-bar-using-only-css
Download : No
Animated horizontal tabs

Demo : http://www.dynamicdrive.com/style/csslibrary/item/animated_horizontal_tabs/
Article : http://www.dynamicdrive.com/style/csslibrary/item/animated_horizontal_tabs/
Download : http://www.dynamicdrive.com/cssexamples/media/tab-blue-right.gif
http://www.dynamicdrive.com/cssexamples/media/tab-blue-left.gif
A Horizontal Button Menu - The Easy Way

Demo : http://www.cssplay.co.uk/menus/listnine.html
Article : http://www.cssplay.co.uk/menus/tutorial.html
Download : No
Here I listed below some of best CSS horizontal menu collection with full configuration tutorials for your easy use.You can choose any menu from the list given below and go directly to the article links for the setup instructions.All of these Horizontal Menus working perfectly only using CSS and sometimes images with CSS.(JavaScript is not used by any menu given here)So you don't want to worry about JavaScript disabled browsers.
If there is any menu CSS you like from the list given below,but you can not add it to your website or blog yourself,you can contact me,I can do it for you.
Advanced CSS Menu

Demo : http://www.webdesignerwall.com/demo/advanced-css-menu/
Article : http://www.webdesignerwall.com/tutorials/advanced-css-menu/
Download : http://www.webdesignerwall.com/file/advanced-css-menu.zip
Bulletproof CSS Sliding Doors

Demo : http://azadcreative.com/files/Bulletproof.zip
Article : http://azadcreative.com/2009/03/bulletproof-css-sliding-doors/
Download : http://azadcreative.com/files/BulletproofSlidingDoors.psd.zip
Create a Slick Menu using CSS3

Demo : http://insicdesigns.com/demo/css3/exp2/index.html
Article : http://blog.insicdesigns.com/2010/02/create-a-slick-menu-using-css3/
Download : No
How to Make a CSS Sprite Powered Menu
Demo : http://s3.amazonaws.com/buildinternet/live-tutorials/css-sprite-menu/css-sprites-nav.html
Article : http://buildinternet.com/2010/01/how-to-make-a-css-sprite-powered-menu/
Download : http://s3.amazonaws.com/buildinternet/live-tutorials/css-sprite-menu/css-sprites-nav.zip
CSS Express Drop-Down Menus

Demo : http://www.projectseven.com/tutorials/navigation/auto_hide/workpage.htm
Article : http://www.projectseven.com/tutorials/navigation/auto_hide/
Download : http://www.projectseven.com/tutorials/navigation/auto_hide/p7exp.zip
CSS3-only horizontal drop line tab menu

Demo : http://www.skyrocketlabs.com/categories/tutorials/css3-only-horizontal-dropline-tab-menu/demo/index.html
Article : http://www.skyrocketlabs.com/articles/css3-only-horizontal-dropline-tab-menu.php
Download : http://www.skyrocketlabs.com/categories/tutorials/css3-only-horizontal-dropline-tab-menu/css3-only-horizontal-dropline-tab-menu.zip
Nicer Navigation with CSS Transitions
Demo : http://www.gethifi.com/blog/nicer-navigation-with-css-transitions
Article : http://www.gethifi.com/blog/nicer-navigation-with-css-transitions
Download : No
Pure CSS Horizontal Menu

Demo : http://devinrolsen.com/wp-content/themes/typebased/demos/css/css-horizontal-menu/WORKS.php
Article : http://www.devinrolsen.com/pure-css-horizontal-menu/
Download : No
DropDown CSS Menu

Demo : http://divitodesign.com/dd-articles/horizontal-css-menu/index.html
Article : http://divitodesign.com/css/how-to-dropdown-css-menu/
Download : http://www.divitodesign.com/dd-articles/horizontal-css-menu/horizontal-css-menu.rar
Pure CSS Menu With Infinite Sub Menus Tutorial

Demo : http://www.devinrolsen.com/wp-content/themes/typebased/demos/css/infinite-sub-menu/
Article : http://www.devinrolsen.com/pure-css-menu-with-infinite-sub-menus-tutorial/
Download : No
CSS3 Dropdown Menu
Demo : http://www.webdesignerwall.com/demo/css3-dropdown-menu/
Article : http://www.webdesignerwall.com/tutorials/css3-dropdown-menu/
Download : No
Elegant Drop Menu with CSS Only

Demo : http://aext.net/example/elegant-menu-with-css-only/
Article : http://aext.net/2009/09/elegant-drop-menu-with-css-only/
Download : http://www.box.net/shared/paoqo8y1lt
CSS dropdown menu without javascripting or hacks

Demo : http://www.texaswebdevelopers.com/blog/examples/ddmenu2.asp
Article : http://www.texaswebdevelopers.com/blog/template_permalink.asp?id=129
Download : No
Create Vimeo-like top navigation

Demo : http://www.jankoatwarpspeed.com/examples/vimeo_navigation/
Article : http://www.jankoatwarpspeed.com/post/2009/01/19/Create-Vimeo-like-top-navigation.aspx
Download : http://www.jankoatwarpspeed.com/file.axd?file=2009%2f1%2fvimeo_navigation.zip
ADxMenu

Demo : http://aplus.rs/adxmenu/examples/htb/
Article : http://aplus.rs/adxmenu/
Download : http://aplus.rs/adxmenu/adxmenu-v4.zip
A Great CSS Horizontal Drop-Down Menu

Demo : http://sperling.com/examples/menuh/
Article : http://sperling.com/examples/menuh/
Download : http://sperling.com/examples/menuh/menuh.css
CSS menus

Demo : http://www.howtocreate.co.uk/tutorials/testMenu.html
Article : http://www.howtocreate.co.uk/tutorials/testMenu.html
Download : No
Pure CSS Fish Eye Menu

Demo : http://www.jampmark.com/html+css-techniques-demos/pure-css-fish-eye-menu-demo.html#expandDown
Article : http://www.jampmark.com/html+css-techniques/pure-css-fish-eye-menu.html
Download : http://www.jampmark.com/downloads/javascript-html-css-codes/pure-css-fish-eye-menu.html
A centered menu with gradient and two pointers

Demo : http://www.cssplay.co.uk/menus/two_points.html
Article : http://www.cssplay.co.uk/menus/two_points.html
Download : No
Create an Advanced CSS3 Menu

Demo : http://blog.cameronbaney.com/tutorials/cbdb-menu/demo.html
Article : http://blog.cameronbaney.com/tutorials/advanced-css3-menu/
Download : http://blog.cameronbaney.com/tutorials/cbdb-menu/cbdb-menu.zip
Solid Block Menu

Demo : http://www.dynamicdrive.com/style/csslibrary/item/solid_block_menu/
Article : http://www.dynamicdrive.com/style/csslibrary/item/solid_block_menu/
Download : http://www.dynamicdrive.com/cssexamples/media/blockdefault.gif
http://www.dynamicdrive.com/cssexamples/media/blockactive.gif
Sleek Pointer Menu

Demo : http://www.dynamicdrive.com/style/csslibrary/item/sleek-pointer-menu/
Article : http://www.dynamicdrive.com/style/csslibrary/item/sleek-pointer-menu/
Download : http://www.dynamicdrive.com/cssexamples/media/rightround.gif
http://www.dynamicdrive.com/cssexamples/media/pointer.gif
Sleek Pointer Menu 2

Demo : http://www.dynamicdrive.com/style/csslibrary/item/sleek-pointer-menu-2/
Article : http://www.dynamicdrive.com/style/csslibrary/item/sleek-pointer-menu-2/
Download : http://www.dynamicdrive.com/cssexamples/media/rightround2.gif
http://www.dynamicdrive.com/cssexamples/media/pointer.gif
How to Create a CSS Menu Using Image Sprites
Demo : http://line25.com/wp-content/uploads/2009/css-menu/demo/demo.html
Article : http://line25.com/tutorials/how-to-create-a-css-menu-using-image-sprites
Download : http://line25.com/wp-content/uploads/2009/css-menu/demo/awesome-menu.zip
CSS Sprite Navigation Tutorial
Demo : http://www.ehousestudio.com/assets/downloads/sprite/
Article : http://www.ehousestudio.com/blog/view/css_sprite_navigation_tutorial
Download : http://www.ehousestudio.com/assets/downloads/sprite.zip
CSS Overlapping Tabs Menu

Demo : http://www.tutorialsphere.com/homemade/uploads/2009/02/css-overlapping-tabs-menu.html
Article : http://www.tutorialsphere.com/homemade/2009/02/18/css-overlapping-tabs-menu
Download : http://www.tutorialsphere.com/homemade/uploads/2009/02/tabs.gif
CSS Navigation Menus

Demo : No
Article : http://www.jacorre.com/design/cssnavmenus.htm
Download : No
CSS3 Chunky Menu

Demo : http://zubeta.com/demo-menu.html
Article : http://zubeta.com/css3-menu-demo.html
Download : No
Creating a glassy non div navigation bar

Demo : http://www.james-blogs.com/wp-content/tutorials/glassy-nav-tabs/
Article : http://www.james-blogs.com/2009/01/07/creating-a-glassy-non-div-navigation-bar/
Download : http://www.james-blogs.com/wp-content/tutorials/glassy-nav-tabs/nav-tab-bg.png
Centered Tabs with CSS

Demo : http://24ways.org/examples/centered-tabs-with-css/final.html
Article : http://24ways.org/2005/centered-tabs-with-css
Download : No
Apple�s Navigation bar using only CSS

Demo : http://westciv.com/style_master/blog/apples-navigation-bar-using-only-css
Article : http://westciv.com/style_master/blog/apples-navigation-bar-using-only-css
Download : No
Animated horizontal tabs

Demo : http://www.dynamicdrive.com/style/csslibrary/item/animated_horizontal_tabs/
Article : http://www.dynamicdrive.com/style/csslibrary/item/animated_horizontal_tabs/
Download : http://www.dynamicdrive.com/cssexamples/media/tab-blue-right.gif
http://www.dynamicdrive.com/cssexamples/media/tab-blue-left.gif
A Horizontal Button Menu - The Easy Way

Demo : http://www.cssplay.co.uk/menus/listnine.html
Article : http://www.cssplay.co.uk/menus/tutorial.html
Download : No
Minggu, 03 Oktober 2010
Attractive Subscribe Section + Search Box For Blogger
css
,
feed
,
feed burner
,
html
,
search box
Tidak ada komentar
:
In this article,I am going to explain how to add more attractive Subscribe Section + Search Box to your blogger blog.This subscribe section is included Feedburner feed and Email subscriptions boxes,Twitter and Facebook boxes for your Twitter and Facebook profiles and Social networking buttons(Digg,Twitter,Facebook,Stumbleupon,Delicious) to share your articles among social networks.These social network buttons are powered by www.addthis.com.Above the subscribe section,Search box is included.You don't want to change anything in the search box code.To add this widget to your blogger sidebar without doing any modification,sidebar width must be at least 305 px. You can add this Subscribe Section + Search Box into your blog within few seconds and very easy to configure.If you like to add this widget to your blog or a website,then follow the steps given below.

1.Login to your blogger dashboard --> Design --> Edit HTML
2.Scroll down to where you see </head> tag .
3.Copy below code and paste it just before the </head> tag .
Save your template.
4.Now go to Design --> Page Elements and click on "Add a gadget".
5.Select "html/java script" and add the code given below and click save.
NOTE : Remember to Replace,
FEEDBURNER-ID with your real Feedburner ID.(4 times).
TWITTER-USERNAME with your real Twitter username.
FACEBOOK-USERNAME with your real Facebook username.
You are done.

1.Login to your blogger dashboard --> Design --> Edit HTML
2.Scroll down to where you see </head> tag .
3.Copy below code and paste it just before the </head> tag .
<style type="text/css">
.subbox{width:305px;border:0 solid #141414;overflow:hidden}
.addthis_toolbox{padding:15px 0 5px 0;text-align:center}
.addthis_toolbox .custom_images a{width:32px;height:32px;margin:0 4px 0 4px;padding:0}
.addthis_toolbox .custom_images a:hover img{opacity:1}
.addthis_toolbox .custom_images a img{opacity:0.85}
.rssbox{background:#f7f6f6;border:1px solid #ccd1d7;padding:5px 10px;margin:10px 0 0 0;-moz-border-radius:10px;-khtml-border-radius:10px;-webkit-border-radius:10px;border-radius:10px;width:125px}
.rssbox:hover{border:1px solid #92aed1}
.rssbox a{color:#7c8a9b;text-transform:uppercase;text-decoration:none;font:bold 12px Arial,Helvetica,Sans-serif}
.rssbox a:hover{color:#7c8a9b;text-decoration:underline}
.emailsbox{background:#f7f6f6;border:1px solid #ccd1d7;padding:5px 10px;margin:10px 0 0 0;-moz-border-radius:10px;-khtml-border-radius:10px;-webkit-border-radius:10px;border-radius:10px;width:125px}
.emailsbox:hover{border:1px solid #92aed1}
.emailsbox a{color:#7c8a9b;text-transform:uppercase;text-decoration:none;font:bold 12px Arial,Helvetica,Sans-serif}
.emailsbox a:hover{color:#7c8a9b;text-decoration:underline}
.twitterbox{background:#f7f6f6;border:1px solid #ccd1d7;padding:5px 10px;margin:10px 0 0 0;-moz-border-radius:10px;-khtml-border-radius:10px;-webkit-border-radius:10px;border-radius:10px;width:125px}
.twitterbox:hover{border:1px solid #92aed1}
.twitterbox a{color:#7c8a9b;text-transform:uppercase;text-decoration:none;font:bold 12px Arial,Helvetica,Sans-serif}
.twitterbox a:hover{color:#7c8a9b;text-decoration:underline}
.facebookbox{background:#f7f6f6;border:1px solid #ccd1d7;padding:5px 10px;margin:10px 0 0 0;-moz-border-radius:10px;-khtml-border-radius:10px;-webkit-border-radius:10px;border-radius:10px;width:125px}
.facebookbox:hover{border:1px solid #92aed1}
.facebookbox a{color:#7c8a9b;text-transform:uppercase;text-decoration:none;font:bold 12px Arial,Helvetica,Sans-serif}
.facebookbox a:hover{color:#7c8a9b;text-decoration:underline}
#search{width:290px;padding:2px 2px;background:#f7f6f6;border:1px solid #ccd1d7;height:28px;margin-top:0;margin-left:5px;display:inline;float:left}
#search:hover{border:1px solid #92aed1}
#search form{margin:0;padding:0}
#search fieldset{margin:0;padding:0;border:none}
#search p{margin:0;font-size:85%}
#s{width:200px;margin:0 0 0 0;padding:5px 5px 5px 5px;border:none;font:normal 80% "Tahoma",Arial,Helvetica,sans-serif;color:#000;float:left;background:#f7f6f6;display:inline}
input#searchsubmit{float:right;display:inline;margin:0 0 0 0;height:28px;background:#b2b2b2;color:#000;border:0 solid #222}
</style>
Save your template.
4.Now go to Design --> Page Elements and click on "Add a gadget".
5.Select "html/java script" and add the code given below and click save.
<div class="subbox">
<div id='search' style='display:inline;'>
<form action='/search' id='searchform' method='get'>
<input id="s" name="q" onblur="if (this.value == "") {this.value = "Search...";}" onfocus="if (this.value == "Search...") {this.value = "";}" type="text" value="Search..." />
<input id="searchsubmit" type="submit" value="Search" />
</form>
</div>
<table><tr>
<td><div class="rssbox">
<a href="http://feeds.feedburner.com/FEEDBURNER-ID" target="_blank" rel="nofollow"><img src="https://blogger.googleusercontent.com/img/b/R29vZ2xl/AVvXsEgIcXm_I3v-QXoWLja-7LoaGHG62fls-ENlRDaSmYx4ppws6-ZvbET6klT23tg81FLbuYBD5B5XfVWp7b7gjLvJ8y1jQua040PmBzCUtqYh3NPHrV4GZKHeJrfL7WvhTK9FaWXYLvKk0SD-/" alt="RSS Feed" title="RSS Feed" style="vertical-align:middle; margin-right: 5px;border:none;" /></a><a href="http://feeds.feedburner.com/FEEDBURNER-ID" target="_blank" rel="nofollow">RSS Feed</a>
</div></td>
<td><div class="emailsbox">
<a href="http://feedburner.google.com/fb/a/mailverify?uri=FEEDBURNER-ID" target="_blank" rel="nofollow"><img src="https://blogger.googleusercontent.com/img/b/R29vZ2xl/AVvXsEgrq16kGpLVs30BFEY2ziSg-ubzkeTR4zjZL-r8QltZVKgXyHF0-BiJ83RT2hfQktwMXQ_QePF52TTFrYJmgvPVOKPPNDWBKeVl3zv_fR7EvLlJZrmI14R_YVdfkZSJ3MrN-Y6chJRTu6-j/" alt="EMail Feed" title="EMail Feed" style="vertical-align:middle; margin-right: 5px;border:none;" /></a><a href="http://feedburner.google.com/fb/a/mailverify?uri=FEEDBURNER-ID" target="_blank" rel="nofollow">EMail Feed</a>
</div></td>
</tr><tr>
<td><div class="twitterbox">
<a href="http://twitter.com/TWITTER-USERNAME" target="_blank" rel="nofollow"><img src="https://blogger.googleusercontent.com/img/b/R29vZ2xl/AVvXsEgQqw2w8tocnLvtSxapAs9jdoXFUEOrMYr54qAqBHedMhd-wVWjO9iZKn7PQRzjMITbz77GGkwA2p0Z-RcBolM6xE2fR_BbKdnCgO5A8UfLoeL4tdeJj_crpnySUrlyAMbwqnIzokBJp01-/" alt="Twitter" title="Twitter" style="vertical-align:middle; margin-right: 5px;border:none;" /></a><a href="http://twitter.com/TWITTER-USERNAME" target="_blank" rel="nofollow">Twitter</a>
</div></td>
<td><div class="facebookbox">
<a href="http://www.facebook.com/FACEBOOK-USERNAME" target="_blank" rel="nofollow"><img src="https://blogger.googleusercontent.com/img/b/R29vZ2xl/AVvXsEi-yNU7z8hJA-9tAh7l4PWYq_ds6rxlylw4QsHUa38W902SxIasnV1tGeAptJK723nvZ6HlTRe9BHJqVtuPZ08fhgcg9N6JoZiVAD1VhI12AKVdB2rMgENzjd7GepR2Vyl0PkpvluKXpEDm/" alt="Facebook" title="Facebook" style="vertical-align:middle; margin-right: 5px;border:none;" /></a><a href="http://www.facebook.com/FACEBOOK-USERNAME" target="_blank" rel="nofollow">Facebook</a>
</div></td>
</tr></table>
<p style="display:none;" align="center">Widget by <a href="http://www.bloggertipandtrick.net/" target="_blank">Blogger Tips And Tricks</a></p>
<div class='addthis_toolbox'>
<div class='custom_images'>
<a class='addthis_button_twitter'><img alt='Twitter' height='32' src='https://blogger.googleusercontent.com/img/b/R29vZ2xl/AVvXsEhCf3M4t_1o7pa99_adVyfeE5eQU1hddAUOkUi56J_U8zYymfTGq_WHbmCBWeoSHTvfzNXA4ex9ril5JFHYbdPaRt77yNpkBCorgbKwbEi_6-zO1FXafMkvFbRX9ftkHUPJi3Z__BNffSc/' width='32'/></a>
<a class='addthis_button_delicious'><img alt='Delicious' height='32' src='https://blogger.googleusercontent.com/img/b/R29vZ2xl/AVvXsEhQ-6_UE09gGE_CbadKz0gjFE_vUw8bGNQ5AnNbouEHPQFau2BLtXq8fVMvhnI7jMElkJuTcaaJ6mSHW-VUbbRzIqebGzGFdl4DDdOSMF1I14y67wzg_cA41qnlYSbt2aKHdBIRZ4Z7M9Q/' width='32'/></a>
<a class='addthis_button_facebook'><img alt='Facebook' height='32' src='https://blogger.googleusercontent.com/img/b/R29vZ2xl/AVvXsEhWhKHzdB6FbW9yBOEN1HWnX1wWCGPe4o52gBcEh56hYuCO0sw0jnnlLawrRpeRKh69Ud1oGGttCrg2PDA4pjD_mPCevG8mbqiQyMyZ8xllWHwTtKv_xTF3NmUjSX38tNpCCuJHfdfD07w/' width='32'/></a>
<a class='addthis_button_digg'><img alt='Digg' height='32' src='https://blogger.googleusercontent.com/img/b/R29vZ2xl/AVvXsEhtx255mgtoQxDSRL05t2MVY-f4vwAXt1TSS8G5HXocnTmAgVfeuaGI8FVnlIxtnTWAjEHIL5VZC696bSDADMBfJgmIFUTeRqrlbRVPnRfHjXGpZJNl6wY5rGER0PIrsRej_t9Zpm93Wlc/' width='32'/></a>
<a class='addthis_button_stumbleupon'><img alt='Stumbleupon' height='32' src='https://blogger.googleusercontent.com/img/b/R29vZ2xl/AVvXsEhXU0853LG1OnkD2f8Ni_Hr_RJctbGeJ9nutwPumy8YV7ZeilNIRdjYcwWcueLUUNTpIk2kC7DMhFsCHDPJpfwb21Z3dRsyEQ6Vg0prOw5KeFrnQuyTDIDn3imA2UTfn6DLEIG_uIHuq8c/' width='32'/></a>
<a class='addthis_button_favorites'><img alt='Favorites' height='32' src='https://blogger.googleusercontent.com/img/b/R29vZ2xl/AVvXsEj2pCPF-gqv1jlYRpVMa5HsyttQV9My9HmRH4PXFAzDOAef9FpC1FEVDiyN3uw1HS5xWu7w8fgLGOOwZpER8GStjApvwvqytLT4ZKszyHHzVzhiCP4BuuJrkVimsG_2g9fkiS3bZm8FW-Q/' width='32'/></a>
<a class='addthis_button_more'><img alt='More' height='32' src='https://blogger.googleusercontent.com/img/b/R29vZ2xl/AVvXsEigcBrL5n3_ImDIaOcC116EwjDGDSqj_ck2x4rl9sF7YJ1nlFBT5nrV7LvgF6Glop8bx2lsTU60BinDqxS66Y93q0zXq5o04d0ESGKpQhsZi067xlujQhV1NXdeuAZPvXm6UkY8qawJ1aE/' width='32'/></a>
</div>
<script src='http://s7.addthis.com/js/250/addthis_widget.js' type='text/javascript'/>
</div>
</div>
NOTE : Remember to Replace,
FEEDBURNER-ID with your real Feedburner ID.(4 times).
TWITTER-USERNAME with your real Twitter username.
FACEBOOK-USERNAME with your real Facebook username.
You are done.
Rabu, 28 Juli 2010
How To Add Smart Jquery Featured Slider to Blogger/Websites
This is a another tutorial about, how to add great featured jquery content slider to your blogger blog or other website.Read the instruction given below to add this featured content slider to your blog with in few minutes.Remember to use 307px width and 254px height images for this slider.I recommend to DOWNLOAD java script files and host it yourself.Also you can see the DEMO of this slider .
1.Login to your blogger dashboard--> Design - -> Edit HTML.
2.Scroll down to where you see </head> tag .
3.Copy below code and paste it just before the </head> tag .

4.Now save your template.
5.Go to Layout --> Page Elements.
6.Click on 'Add a Gadget'.
7.Select 'HTML/Javascript' and add the code given below:
NOTE : Replace,
SLIDE-X-LINK-HERE with your real featured posts links.
SLIDE-X-IMAGE-ADDRESS-HERE with your real slide images addresses.
Look at the example below:
You are done.
1.Login to your blogger dashboard--> Design - -> Edit HTML.
2.Scroll down to where you see </head> tag .
3.Copy below code and paste it just before the </head> tag .

<script src='http://bnote.googlecode.com/files/jquery-1.2.6.min.js' type='text/javascript'></script>
<script src='http://bnote.googlecode.com/files/jquery.jcarousel.pack.js' type='text/javascript'></script>
<script src='http://bnote.googlecode.com/files/jquery-ui-personalized-1.5.2.packed.js' type='text/javascript'></script>

<script type="text/javascript">
jQuery(document).ready(function() {
          jQuery('#mycarousel').jcarousel({
          wrap:"both",
          scroll:2,
          animation:"slow"
  });
          function mycarousel_initCallback(carousel) {
          jQuery('#featured-next-button').bind('click', function() {
                  carousel.next();
                  return false;
          });

          jQuery('#featured-prev-button').bind('click', function() {
                  carousel.prev();
                  return false;
          });
          jQuery('.button-nav span').bind('click', function() {
                  carousel.scroll(jQuery.jcarousel.intval(jQuery(this).text()));
                  return false;
          });
  };
          jQuery('#feature-carousel').jcarousel({
          wrap:"both",
          scroll:1,
          auto:10,
          initCallback: mycarousel_initCallback,
          buttonNextHTML: null,
          buttonPrevHTML: null
  });

});
</script>

<style type="text/css">
.jcarousel-skin-tango .jcarousel-container {-moz-border-radius: 10px;}

.jcarousel-skin-tango .jcarousel-container-horizontal {width: 941px;margin: 0 auto;padding:0 20px;}

.jcarousel-skin-tango .jcarousel-clip-horizontal {width:  941px;height: 254px;}
.jcarousel-skin-tango .jcarousel-item {width: 307px;height: 254px;}
.jcarousel-skin-tango .jcarousel-item-horizontal {margin-right: 10px;}
.jcarousel-skin-tango .jcarousel-item-placeholder {background: #fff;color: #000;}

.jcarousel-skin-tango .jcarousel-next-horizontal {
background:transparent url(https://blogger.googleusercontent.com/img/b/R29vZ2xl/AVvXsEhWMEcy_NgpPijWx31CQlvpj5WCgMJCAyWMluo8ed0wQbOe5ivtE5S0H9hpGXMIHpyVnGHPcumwP1Q8o2K318MSrJdKCl1HOFybvzTsQscdcv0f_NCGUxZFiJaLVdHSKqKIxITv7tyjBMgu/s1600/image-slider-button.png) no-repeat scroll -46px 0;
cursor:pointer;
height:254px;
right:20px;
position:absolute;
top:0;
width:46px;
}

.jcarousel-skin-tango .jcarousel-prev-horizontal {
background:transparent url(https://blogger.googleusercontent.com/img/b/R29vZ2xl/AVvXsEhWMEcy_NgpPijWx31CQlvpj5WCgMJCAyWMluo8ed0wQbOe5ivtE5S0H9hpGXMIHpyVnGHPcumwP1Q8o2K318MSrJdKCl1HOFybvzTsQscdcv0f_NCGUxZFiJaLVdHSKqKIxITv7tyjBMgu/s1600/image-slider-button.png) no-repeat scroll 0 0;
cursor:pointer;
height:254px;
left:20px;
position:absolute;
top:0;
width:46px;
}

.jcarousel-container {position: relative;}
.jcarousel-clip {z-index: 2;padding: 0;margin: 0;overflow: hidden;position: relative;}
.jcarousel-list {z-index: 1;overflow: hidden;position: relative;top: 0;left: 0;margin: 0;padding: 0;}
.jcarousel-list li,.jcarousel-item {float: left;list-style: none;width: 75px;height: 75px;}
.jcarousel-next {z-index: 3;display: none;}
.jcarousel-prev {z-index: 3;display: none;}

#news-slider{background-color:#FFFFFF;padding:20px 0;}
#news-slider img{border:none;height:254px;width:307px;}
</style>
4.Now save your template.
5.Go to Layout --> Page Elements.
6.Click on 'Add a Gadget'.
7.Select 'HTML/Javascript' and add the code given below:
<div id='news-slider'>
<ul class='jcarousel-skin-tango' id='mycarousel'>
<li><a href='SLIDE-1-LINK-HERE'><img src='SLIDE-1-IMAGE-ADDRESS-HERE'/></a></li>
<li><a href='SLIDE-2-LINK-HERE'><img src='SLIDE-2-IMAGE-ADDRESS-HERE'/></a></li>
<li><a href='SLIDE-3-LINK-HERE'><img src='SLIDE-3-IMAGE-ADDRESS-HERE'/></a></li>
<li><a href='SLIDE-4-LINK-HERE'><img src='SLIDE-4-IMAGE-ADDRESS-HERE'/></a></li>
<li><a href='SLIDE-5-LINK-HERE'><img src='SLIDE-5-IMAGE-ADDRESS-HERE'/></a></li>
</ul>
</div>
NOTE : Replace,
SLIDE-X-LINK-HERE with your real featured posts links.
SLIDE-X-IMAGE-ADDRESS-HERE with your real slide images addresses.
Look at the example below:
<div id='news-slider'>
<ul class='jcarousel-skin-tango' id='mycarousel'>
<li><a href='#'><img src='https://blogger.googleusercontent.com/img/b/R29vZ2xl/AVvXsEhDmMqpLpg_5ANyNlOwEm_99s-POnUQnu3eFLcnuyqS2bYmUjd_5U11JRr1HF6rm22HGeaj2_Nf4N2Sd1yS7oMb5c-RaqwZVX06cBE8S5ZnDpmGtfASN92QBwEozamKTv3jOxYv0oxEdyvG/s1600/slide1.jpg'/></a></li>
<li><a href='#'><img src='https://blogger.googleusercontent.com/img/b/R29vZ2xl/AVvXsEhlY-8uUDnvncnzvH4QV4BpOnIjpKE4ApR_MoLtYPa5U6Eb7BHWoveJBGbLigKOG3g0tQJEItfE2fn4020EBH1Cegi2ZjlDwdaAQs8D30Y6TYXS2B3m-ftXwrannT0hZKKglyzFhbjnFx9I/s1600/slide2.jpg'/></a></li>
<li><a href='#'><img src='https://blogger.googleusercontent.com/img/b/R29vZ2xl/AVvXsEgCkHTI1uDvB6-B8nKXwDBgn-Ve0fFqqJqaa6P_tsDRPvOcJ2KPe2cqaHU0JJHjToujPhGgnnfnaAn0dhScXyFx275VuRgHoOmmrquIy4luKux-CVKM6bf5jEU4XEQ4_s5Yqyjm-MTKCBfp/s1600/slide3.jpg'/></a></li>
<li><a href='#'><img src='https://blogger.googleusercontent.com/img/b/R29vZ2xl/AVvXsEjn7cKVjK1x-ElgdEU1ptwUXkT5vEyNbatJYbQrtNFTMWydWXdqZPZ70X513xwSAM1ZyqQzGNyV5dZxXGaqS38IKSONHvIsMk_wrmFjCPzkK4KtsXmBc0AzoVavjQXMU2ID_H82mcypcg8N/s1600/slide4.jpg'/></a></li>
<li><a href='#'><img src='https://blogger.googleusercontent.com/img/b/R29vZ2xl/AVvXsEjEmBmeAGl-6WXIBqoaWCPYlAEpMWihzQKkMBGv3PxU-qH4qoVhyOfQbjhOk1NqEm_EQ5Bh1KgsNMWC3Gmpzv5dmqCTVxEWSAWqB5BZh6QT1MNRdyZnKexJ43Qu34VDXxt3rEj2Ob8J54LQ/s1600/slide5.jpg'/></a></li>
</ul>
</div>
You are done.
Selasa, 20 Juli 2010
How To Create JQuery Featured Content Slideshow
In this tutorial I am going to explain,how to create a slideshow to show your featured content to visitors.This is very easy to add and configure.This slideshow is working using jquery.You do not want to host any java script file yourself to add this slideshow to your blog.So you can add this slideshow to your site with in few minutes.Default width=600px and height=240px.But you can change it easily to match it for your website.
If you like add this slideshow to your blogger blog or website,then follow the steps given below.

1.Login to your blogger dashboard--> Design - -> Edit HTML.
2.Scroll down to where you see </head> tag .
3.Copy below code and paste it just before the </head> tag .
4.Now save your template.
5.Go to Layout --> Page Elements.
6.Click on 'Add a Gadget'.
7.Select 'HTML/Javascript' and add the code given below:
You can add more slides as you like.
Note : Replace images URLs,"This is featured post X title","Replace This Text With Your Featured Post X Description" with your content.
You are done.
If you like add this slideshow to your blogger blog or website,then follow the steps given below.

1.Login to your blogger dashboard--> Design - -> Edit HTML.
2.Scroll down to where you see </head> tag .
3.Copy below code and paste it just before the </head> tag .
<script src='http://ajax.googleapis.com/ajax/libs/jquery/1.4.2/jquery.min.js' type='text/javascript'></script>

<script type='text/javascript'>
//<![CDATA[

$(document).ready(function() {

//Execute the slideShow, set 6 seconds for each images
slideShow(3000);

});

function slideShow(speed) {


//append a LI item to the UL list for displaying caption
$('ul.slideshow').append('<li id="slideshow-caption" class="caption"><div class="slideshow-caption-container"><h3></h3><p></p></div></li>');

//Set the opacity of all images to 0
$('ul.slideshow li').css({opacity: 0.0});

//Get the first image and display it (set it to full opacity)
$('ul.slideshow li:first').css({opacity: 1.0});

//Get the caption of the first image from REL attribute and display it
$('#slideshow-caption h3').html($('ul.slideshow a:first').find('img').attr('title'));
$('#slideshow-caption p').html($('ul.slideshow a:first').find('img').attr('alt'));

//Display the caption
$('#slideshow-caption').css({opacity: 0.7, bottom:0});

//Call the gallery function to run the slideshow
var timer = setInterval('gallery()',speed);

//pause the slideshow on mouse over
$('ul.slideshow').hover(
        function () {
                clearInterval(timer);
        },
        function () {
                timer = setInterval('gallery()',speed);
        }
);

}

function gallery() {


//if no IMGs have the show class, grab the first image
var current = ($('ul.slideshow li.show')?  $('ul.slideshow li.show') : $('#ul.slideshow li:first'));

//Get next image, if it reached the end of the slideshow, rotate it back to the first image
var next = ((current.next().length) ? ((current.next().attr('id') == 'slideshow-caption')? $('ul.slideshow li:first') :current.next()) : $('ul.slideshow li:first'));

//Get next image caption
var title = next.find('img').attr('title');
var desc = next.find('img').attr('alt');

//Set the fade in effect for the next image, show class has higher z-index
next.css({opacity: 0.0}).addClass('show').animate({opacity: 1.0}, 1000);

//Hide the caption first, and then set and display the caption
$('#slideshow-caption').animate({bottom:-70}, 300, function () {
                //Display the content
                $('#slideshow-caption h3').html(title);
                $('#slideshow-caption p').html(desc);
                $('#slideshow-caption').animate({bottom:0}, 500);
});

//Hide the current image
current.animate({opacity: 0.0}, 1000).removeClass('show');

}

//]]>
</script>

<style type="text/css">
ul.slideshow {
list-style:none;
width:600px;
height:240px;
overflow:hidden;
position:relative;
margin:0;
padding:0;
font-family:Arial,Helvetica,Trebuchet MS,Verdana;
;
}
ul.slideshow li {
position:absolute;
left:0;
right:0;
}
ul.slideshow li.show {
z-index:500;
}
ul img {
width:600px;
height:240px;
border:none;
}
#slideshow-caption {
width:600px;
height:70px;
position:absolute;
bottom:0;
left:0;
color:#fff;
background:#000;
z-index:500;
}
#slideshow-caption .slideshow-caption-container {
padding:5px 10px;
z-index:1000;
}
#slideshow-caption h3 {
margin:0;
padding:0;
font-size:16px;
}
#slideshow-caption p {
margin:5px 0 0 0;
padding:0;
}
</style>
4.Now save your template.
5.Go to Layout --> Page Elements.
6.Click on 'Add a Gadget'.
7.Select 'HTML/Javascript' and add the code given below:
<ul class="slideshow">

<li><a href="#"><img src="https://blogger.googleusercontent.com/img/b/R29vZ2xl/AVvXsEg5tWJtOAfFKVne7p364_lk3via08rvHZCQ-vAzRtC_KdOJiWO3EPG-ZIxldpN83fDB9guaG_hnCdCN8aDILSKl-fyA6sodh1ptf1IB5hKJXw_ghZeHhcVUIDWciWta5jFCXB-Z5MKchk4/s1600/1.jpg" title="This is featured post 1 title" alt="Replace This Text With Your Featured Post 1 Description." /></a></li>

<li><a href="#"><img src="https://blogger.googleusercontent.com/img/b/R29vZ2xl/AVvXsEjhyVJTQGxooZV0vF3W9yC1izSNP3IiQn7QFz9YLudqCAfhbm9b_DAJaK__jOY7X8j0U9tHm-Nb2xwX7uPBZUGNmZMqlfS6Jtj-BUBVkKnIMhT2qcSrAx0LM4075hRFh4KYHW-gXnmCB-M/s1600/2.jpg" title="This is featured post 2 title" alt="Replace This Text With Your Featured Post 2 Description." /></a></li>

<li><a href="#"><img src="https://blogger.googleusercontent.com/img/b/R29vZ2xl/AVvXsEgcGfbAt41wyUeJiM4rRhkz9i4-atrxaaFsH9qQ_RIEfCi9vWonWzBCFrNzXiWDDO7iNA24LdlqiGPUzSPrWLhJ0-xGMD3FpH9l6UIp_NXPjnRdeKyCyMSFgpwXKdp4cWxdWo5CYbE1pkU/s1600/3.jpg" title="This is featured post 3 title" alt="Replace This Text With Your Featured Post 3 Description." /></a></li>

<li><a href="#"><img src="https://blogger.googleusercontent.com/img/b/R29vZ2xl/AVvXsEhyR0DLGcPcKVK5Z8Gcfc0fgd5netzB3WXGfcp8Gv_bYihc8xmHuZoYmLM14ZLSgIlP8d9upIrUhu8WEUolIrDSByrmTS1jFxRTzxkCPOxIe2h03SnZp9yLL7Co3_GCxFnwpa2fqLrUVis/s1600/4.jpg" title="This is featured post 4 title" alt="Replace This Text With Your Featured Post 4 Description." /></a></li>

</ul>
You can add more slides as you like.
Note : Replace images URLs,"This is featured post X title","Replace This Text With Your Featured Post X Description" with your content.
You are done.
Kamis, 03 Juni 2010
How To Embed URL,HTML,Forum Links Code below Blogger Posts
This tutorial will explain how to create a widget, for your visitors to link back to your article/blogger post.This was created by me(http://www.bloggertipandtrick.net/) and previously I had installed this widget to this site.Many visitors ask from me how to add this widget to their blogger blogs and so I decided to explain it.This widget will show 3 codes (Blog Post URL,HTML code to embed your post to a website,Forum Link to embed your post to a forum) below your blogger post.If you like to add this widget to your blogger blog,then follow the steps given below.
1.Login to your blogger dashboard--> layout- -> Edit HTML
2.Scroll down to where you see </head> tag .
3.Copy below code and paste it just before the </head> tag .

4.Now find below code:
5.Copy below code and paste it just after the <data:post.body/> .
NOTE : Don't change anything in above code.
6.Save your template and you are done.
1.Login to your blogger dashboard--> layout- -> Edit HTML
2.Scroll down to where you see </head> tag .
3.Copy below code and paste it just before the </head> tag .

<style type='text/css'>
.about-article{
background-color:#f9f9f9;
padding-bottom:5px;
padding-left:20px;
font-size:11px;
}
.about-article input{
background-color:#ffffff;
}
</style>
4.Now find below code:
<data:post.body/>5.Copy below code and paste it just after the <data:post.body/> .
<b:if cond='data:blog.pageType == "item"'>
<div class="about-article"><p>If you find this article useful, please feel free to link to this page from your website or blog.</p><p class="noborder"><label for="aa-url">URL:</label><br /><input size="80" readonly="readonly" onclick="this.focus();this.select();" type="text" id="aa-url" value="<data:post.url/>" /></p><p><label for="aa-forum">HTML Link:</label><br /><input size="80" readonly="readonly" onclick="this.focus();this.select();" type="text" id="aa-forum" value="<a href=&quot;<data:post.url/>&quot;><data:post.title/></a>" /></p><p>
<label for="aa-forum">Forum Link:</label><br />
<input size="80" readonly="readonly" onclick="this.focus();this.select();" type="text" id="aa-forum" value="[url=<data:post.url/>]/<data:post.title/>[/url]" /></p>
<p align='center'><a href='http://www.bloggertipandtrick.net/' style='display:none;' target='_blank'>Widget by BloggerTipAndTrick</a></p>
</div><br/>
</b:if>
NOTE : Don't change anything in above code.
6.Save your template and you are done.
Senin, 31 Mei 2010
How To Change Colors of Selected/Highlighted Texts
This tutorial will explains to you how to change colors of your selected/highlighted texts and selected text's backgrounds.This is very easy to do,But have a one problem,this method is not working in Internet explorer.But I think this will helpful to you add some attraction to your website.Follow the steps given below to do this.
1.Login to your blogger dashboard--> layout- -> Edit HTML
2.Scroll down to where you see </head> tag .
3.Copy below code and paste it just before the </head> tag .
Note : You can change colors as you like.
4.Now save your template.You are done.
Look at the picture given below.

1.Login to your blogger dashboard--> layout- -> Edit HTML
2.Scroll down to where you see </head> tag .
3.Copy below code and paste it just before the </head> tag .
<style type="text/css">
::selection {background:#cc0000;color:#ffffff;}
::-moz-selection{background:#cc0000;color:#ffffff;}
code::selection {background: #333333;color:#ffffff;}
code::-moz-selection {background: #333333;color:#ffffff;}
pre::selection {background: #44ceff;color:#ffffff;}
pre::-moz-selection {background: #44ceff;color:#ffffff;}
</style>
Note : You can change colors as you like.
4.Now save your template.You are done.
Look at the picture given below.

Sabtu, 06 Februari 2010
How To Add Beautiful Subscribe Section to Blogger
css
,
feed burner
,
html
,
twitter
,
widget
Tidak ada komentar
:
Do you like to add a good looking Subscribe section to your blog?Then simply follow the steps below.
1.Login to your blogger dashboard--> layout- -> Edit HTML
2.Scroll down to where you see </head> tag .
3.Copy below code and paste it just before the </head> tag .

NOTE : Host RSS.png , EmailRSS.png , twitter.png yourself.
4.Now go to Layout-->Page Element and click on "Add a gadget".
5.Select "html/java script" and add the code given below and click save.
NOTE : Replace YOUR-RSS-FEED-URL , YOUR-FEEDBURNER-EMAIL-SUBSCRIPTION-URL , YOUR-TWITTER-URL with your urls.
Look at the example below:
You are done.
1.Login to your blogger dashboard--> layout- -> Edit HTML
2.Scroll down to where you see </head> tag .
3.Copy below code and paste it just before the </head> tag .

<style type='text/css'>
#hsection{border:4px solid #D3D3D3;background-color:#e9e9e9;}
#hsection:hover{border:4px solid #BABABA;background-color:#e9e9e9;}
#sectionmy .sectionmy2 h2.subscription { border:0; margin:0; padding:6px 0 0 55px; height:42px; font-size:16px;font-family:"Segoe UI",Calibri,"Myriad Pro",Myriad,"Trebuchet MS",Helvetica,Arial,sans-serif;
font-weight:bold; }
#sectionmy .sectionmy2 h2.rss { background:url(https://blogger.googleusercontent.com/img/b/R29vZ2xl/AVvXsEjH30jVhBen5IoecLVck4YuvQtrwlcEGWQpW-1GFLIlcMtNVcKRghHLcr8_BBsg9T6LBVpKTtst7m5EJdnP2Xhcz-ARPWHsO4jP8RqFgJbVRVKCVrnbNfM1-oIRYhubhbWP5ZyaPhQrPvg2/) no-repeat top left; }
#sectionmy .sectionmy2 h2.email { background:url(https://blogger.googleusercontent.com/img/b/R29vZ2xl/AVvXsEjL3DqKSuSXmCfAKSK628BH8GOscWXvT-4FiQExySN1JfvnGxazeV53pu1nQ0s7Ysx6SBgOPwexDOTDHcEPa2dUBiWeN-wB6zvySjWN0-pOu2NxUP7K_VUeb3NDllRxmiemVDy7L2ABgeul/) no-repeat top left; }
#sectionmy .sectionmy2 h2.twitter { background:url(https://blogger.googleusercontent.com/img/b/R29vZ2xl/AVvXsEhKWBtrcavbOwD0li0RwoNiiY_pGSsu9P7DuhAPVrrlA5W6c_jtiW__8SmCJ2eM5QrYRmk0mS4wYpYxChoTmdjCyMD9huYttln1vddDqxDqzP5aq7K5slY9fpGE4T6-v5wQ7gD4yRJl8xCW/) no-repeat top left; }
#sectionmy .sectionmy2 .subscription a { color:#252e28; text-decoration:none; }
</style>
NOTE : Host RSS.png , EmailRSS.png , twitter.png yourself.
 |  |  |
4.Now go to Layout-->Page Element and click on "Add a gadget".
5.Select "html/java script" and add the code given below and click save.
<div id="hsection">
<div id="sectionmy">
<div class="sectionmy2">

<h2 class="subscription rss"><a href="YOUR-RSS-FEED-URL">SUBSCRIBE VIA RSS</a></h2>

<h2 class="subscription email"><a href="YOUR-FEEDBURNER-EMAIL-SUBSCRIPTION-URL">SUBSCRIBE VIA EMAIL</a></h2>

<h2 class="subscription twitter"><a href="YOUR-TWITTER-URL">FOLLOW ON TWITTER</a></h2>

</div></div>
</div>
NOTE : Replace YOUR-RSS-FEED-URL , YOUR-FEEDBURNER-EMAIL-SUBSCRIPTION-URL , YOUR-TWITTER-URL with your urls.
Look at the example below:
<div id="hsection">
<div id="sectionmy">
<div class="sectionmy2">

<h2 class="subscription rss"><a href="http://feeds2.feedburner.com/blogspot/WyNa">SUBSCRIBE VIA RSS</a></h2>

<h2 class="subscription email"><a href="http://feedburner.google.com/fb/a/mailverify?uri=blogspot/WyNa&loc=en_US">SUBSCRIBE VIA EMAIL</a></h2>

<h2 class="subscription twitter"><a href="http://www.twitter.com/btipandtrick">FOLLOW ON TWITTER</a></h2>

</div></div>
</div>
You are done.
Sabtu, 30 Januari 2010
How to Add Multi Tabbed Section to Blogger
To add a nice multi tab section to your blog follow the steps given below.
1.Login to your blogger dashboard--> layout- -> Edit HTML
2.Scroll down to where you see </head> tag .
3.Copy below code and paste it just before the </head> tag .

Note : Host bullet.gif image yourself.

4.Now go to Layout-->Page Element and click on "Add a gadget".
5.Select "html/java script" and add the code given below and click save.
Note:
Replace ENTER-TAB-1-CONTENT , ENTER-TAB-2-CONTENT , ENTER-TAB-3-CONTENT with your content.
And also you can change Tabs Names.(Red coloured text)
You are done.
1.Login to your blogger dashboard--> layout- -> Edit HTML
2.Scroll down to where you see </head> tag .
3.Copy below code and paste it just before the </head> tag .

<style type='text/css'>
h2 { font-size:11px;}
.tabberlive .tabbertabhide {
display:none;
}
.tabber { font-size:11px;
}
.tabberlive {
}
ul.tabbernav
{
padding: 3px 0;
}
ul.tabbernav li
{
list-style: none;
display: inline;
}
ul.tabbernav li a
{
padding: 3px 0.5em;
margin-right: 3px;
border-bottom: none;
background: #eeedea;
text-decoration: none;
}
ul.tabbernav li a:link {}
ul.tabbernav li a:visited { }
ul.tabbernav li a:hover
{
color: #000;
background: #f8f8f4;
}
ul.tabbernav li.tabberactive a
{
background: #f8f8f4;
}
ul.tabbernav li.tabberactive a:hover
{
color: #333;
background: #f8f8f4;
}
/*--------------------------------------------------
.tabbertab = the tab content
Add style only after the tabber interface is set up (.tabberlive)
--------------------------------------------------*/
.tabberlive .tabbertab {
padding:5px;
border-top:0;
background:#f5f5f3;
/* If you don't want the tab size changing whenever a tab is changed
you can set a fixed height */
/* height:200px; */
/* If you set a fix height set overflow to auto and you will get a
scrollbar when necessary */
/* overflow:auto; */
}
/* If desired, hide the heading since a heading is provided by the tab */
.tabberlive .tabbertab h2 {
display:none;
}
.tabberlive .tabbertab h3 {
display:none;
}
/* Example of using an ID to set different styles for the tabs on the page */
.tabberlive#tab1 {
}
.tabberlive#tab2 {
}
.tabberlive#tab2 .tabbertab {
height:200px;
overflow:auto;
}
.tabbertab p { padding-bottom:10px; line-height:140%; }
.tabbertab ul { padding:0; margin:0;}
.tabbertab ul li { padding:5px 0 6px 0; font-size:11px; }
.tabbertab ul li { background:url(https://blogger.googleusercontent.com/img/b/R29vZ2xl/AVvXsEgNc294NB6MHKu5II6234IELDafGCAqDn8lxjsQ8myxcM4PDHJYo6OuX3AIqPMScyDZRjNqftm4U3nFftC76g1Mxrw3p5NZb5IOcXsyGAfg6ArZpvC5Gg16-nnwQ0aHv4ampPd1dwaFYsdb/) no-repeat 0 7px; padding-left:16px; border-bottom:1px solid #eeedea;}
</style>
<script type='text/javascript'>
//<![CDATA[
/*==================================================
$Id: tabber.js,v 1.9 2006/04/27 20:51:51 pat Exp $
tabber.js by Patrick Fitzgerald pat@barelyfitz.com
Documentation can be found at the following URL:
http://www.barelyfitz.com/projects/tabber/
License (http://www.opensource.org/licenses/mit-license.php)
Copyright (c) 2006 Patrick Fitzgerald
Permission is hereby granted, free of charge, to any person
obtaining a copy of this software and associated documentation files
(the "Software"), to deal in the Software without restriction,
including without limitation the rights to use, copy, modify, merge,
publish, distribute, sublicense, and/or sell copies of the Software,
and to permit persons to whom the Software is furnished to do so,
subject to the following conditions:
The above copyright notice and this permission notice shall be
included in all copies or substantial portions of the Software.
THE SOFTWARE IS PROVIDED "AS IS", WITHOUT WARRANTY OF ANY KIND,
EXPRESS OR IMPLIED, INCLUDING BUT NOT LIMITED TO THE WARRANTIES OF
MERCHANTABILITY, FITNESS FOR A PARTICULAR PURPOSE AND
NONINFRINGEMENT. IN NO EVENT SHALL THE AUTHORS OR COPYRIGHT HOLDERS
BE LIABLE FOR ANY CLAIM, DAMAGES OR OTHER LIABILITY, WHETHER IN AN
ACTION OF CONTRACT, TORT OR OTHERWISE, ARISING FROM, OUT OF OR IN
CONNECTION WITH THE SOFTWARE OR THE USE OR OTHER DEALINGS IN THE
SOFTWARE.
==================================================*/
function tabberObj(argsObj)
{
var arg; /* name of an argument to override */
/* Element for the main tabber div. If you supply this in argsObj,
then the init() method will be called.
*/
this.div = null;
/* Class of the main tabber div */
this.classMain = "tabber";
/* Rename classMain to classMainLive after tabifying
(so a different style can be applied)
*/
this.classMainLive = "tabberlive";
/* Class of each DIV that contains a tab */
this.classTab = "tabbertab";
/* Class to indicate which tab should be active on startup */
this.classTabDefault = "tabbertabdefault";
/* Class for the navigation UL */
this.classNav = "tabbernav";
/* When a tab is to be hidden, instead of setting display='none', we
set the class of the div to classTabHide. In your screen
stylesheet you should set classTabHide to display:none. In your
print stylesheet you should set display:block to ensure that all
the information is printed.
*/
this.classTabHide = "tabbertabhide";
/* Class to set the navigation LI when the tab is active, so you can
use a different style on the active tab.
*/
this.classNavActive = "tabberactive";
/* Elements that might contain the title for the tab, only used if a
title is not specified in the TITLE attribute of DIV classTab.
*/
this.titleElements = ['h2','h3','h4','h5','h6'];
/* Should we strip out the HTML from the innerHTML of the title elements?
This should usually be true.
*/
this.titleElementsStripHTML = true;
/* If the user specified the tab names using a TITLE attribute on
the DIV, then the browser will display a tooltip whenever the
mouse is over the DIV. To prevent this tooltip, we can remove the
TITLE attribute after getting the tab name.
*/
this.removeTitle = true;
/* If you want to add an id to each link set this to true */
this.addLinkId = false;
/* If addIds==true, then you can set a format for the ids.
<tabberid> will be replaced with the id of the main tabber div.
<tabnumberzero> will be replaced with the tab number
(tab numbers starting at zero)
<tabnumberone> will be replaced with the tab number
(tab numbers starting at one)
<tabtitle> will be replaced by the tab title
(with all non-alphanumeric characters removed)
*/
this.linkIdFormat = '<tabberid>nav<tabnumberone>';
/* You can override the defaults listed above by passing in an object:
var mytab = new tabber({property:value,property:value});
*/
for (arg in argsObj) { this[arg] = argsObj[arg]; }
/* Create regular expressions for the class names; Note: if you
change the class names after a new object is created you must
also change these regular expressions.
*/
this.REclassMain = new RegExp('\\b' + this.classMain + '\\b', 'gi');
this.REclassMainLive = new RegExp('\\b' + this.classMainLive + '\\b', 'gi');
this.REclassTab = new RegExp('\\b' + this.classTab + '\\b', 'gi');
this.REclassTabDefault = new RegExp('\\b' + this.classTabDefault + '\\b', 'gi');
this.REclassTabHide = new RegExp('\\b' + this.classTabHide + '\\b', 'gi');
/* Array of objects holding info about each tab */
this.tabs = new Array();
/* If the main tabber div was specified, call init() now */
if (this.div) {
this.init(this.div);
/* We don't need the main div anymore, and to prevent a memory leak
in IE, we must remove the circular reference between the div
and the tabber object. */
this.div = null;
}
}
/*--------------------------------------------------
Methods for tabberObj
--------------------------------------------------*/
tabberObj.prototype.init = function(e)
{
/* Set up the tabber interface.
e = element (the main containing div)
Example:
init(document.getElementById('mytabberdiv'))
*/
var
childNodes, /* child nodes of the tabber div */
i, i2, /* loop indices */
t, /* object to store info about a single tab */
defaultTab=0, /* which tab to select by default */
DOM_ul, /* tabbernav list */
DOM_li, /* tabbernav list item */
DOM_a, /* tabbernav link */
aId, /* A unique id for DOM_a */
headingElement; /* searching for text to use in the tab */
/* Verify that the browser supports DOM scripting */
if (!document.getElementsByTagName) { return false; }
/* If the main DIV has an ID then save it. */
if (e.id) {
this.id = e.id;
}
/* Clear the tabs array (but it should normally be empty) */
this.tabs.length = 0;
/* Loop through an array of all the child nodes within our tabber element. */
childNodes = e.childNodes;
for(i=0; i < childNodes.length; i++) {
/* Find the nodes where class="tabbertab" */
if(childNodes[i].className &&
childNodes[i].className.match(this.REclassTab)) {
/* Create a new object to save info about this tab */
t = new Object();
/* Save a pointer to the div for this tab */
t.div = childNodes[i];
/* Add the new object to the array of tabs */
this.tabs[this.tabs.length] = t;
/* If the class name contains classTabDefault,
then select this tab by default.
*/
if (childNodes[i].className.match(this.REclassTabDefault)) {
defaultTab = this.tabs.length-1;
}
}
}
/* Create a new UL list to hold the tab headings */
DOM_ul = document.createElement("ul");
DOM_ul.className = this.classNav;
/* Loop through each tab we found */
for (i=0; i < this.tabs.length; i++) {
t = this.tabs[i];
/* Get the label to use for this tab:
From the title attribute on the DIV,
Or from one of the this.titleElements[] elements,
Or use an automatically generated number.
*/
t.headingText = t.div.title;
/* Remove the title attribute to prevent a tooltip from appearing */
if (this.removeTitle) { t.div.title = ''; }
if (!t.headingText) {
/* Title was not defined in the title of the DIV,
So try to get the title from an element within the DIV.
Go through the list of elements in this.titleElements
(typically heading elements ['h2','h3','h4'])
*/
for (i2=0; i2<this.titleElements.length; i2++) {
headingElement = t.div.getElementsByTagName(this.titleElements[i2])[0];
if (headingElement) {
t.headingText = headingElement.innerHTML;
if (this.titleElementsStripHTML) {
t.headingText.replace(/<br>/gi," ");
t.headingText = t.headingText.replace(/<[^>]+>/g,"");
}
break;
}
}
}
if (!t.headingText) {
/* Title was not found (or is blank) so automatically generate a
number for the tab.
*/
t.headingText = i + 1;
}
/* Create a list element for the tab */
DOM_li = document.createElement("li");
/* Save a reference to this list item so we can later change it to
the "active" class */
t.li = DOM_li;
/* Create a link to activate the tab */
DOM_a = document.createElement("a");
DOM_a.appendChild(document.createTextNode(t.headingText));
DOM_a.href = "javascript:void(null);";
DOM_a.title = t.headingText;
DOM_a.onclick = this.navClick;
/* Add some properties to the link so we can identify which tab
was clicked. Later the navClick method will need this.
*/
DOM_a.tabber = this;
DOM_a.tabberIndex = i;
/* Do we need to add an id to DOM_a? */
if (this.addLinkId && this.linkIdFormat) {
/* Determine the id name */
aId = this.linkIdFormat;
aId = aId.replace(/<tabberid>/gi, this.id);
aId = aId.replace(/<tabnumberzero>/gi, i);
aId = aId.replace(/<tabnumberone>/gi, i+1);
aId = aId.replace(/<tabtitle>/gi, t.headingText.replace(/[^a-zA-Z0-9\-]/gi, ''));
DOM_a.id = aId;
}
/* Add the link to the list element */
DOM_li.appendChild(DOM_a);
/* Add the list element to the list */
DOM_ul.appendChild(DOM_li);
}
/* Add the UL list to the beginning of the tabber div */
e.insertBefore(DOM_ul, e.firstChild);
/* Make the tabber div "live" so different CSS can be applied */
e.className = e.className.replace(this.REclassMain, this.classMainLive);
/* Activate the default tab, and do not call the onclick handler */
this.tabShow(defaultTab);
/* If the user specified an onLoad function, call it now. */
if (typeof this.onLoad == 'function') {
this.onLoad({tabber:this});
}
return this;
};
tabberObj.prototype.navClick = function(event)
{
/* This method should only be called by the onClick event of an <A>
element, in which case we will determine which tab was clicked by
examining a property that we previously attached to the <A>
element.
Since this was triggered from an onClick event, the variable
"this" refers to the <A> element that triggered the onClick
event (and not to the tabberObj).
When tabberObj was initialized, we added some extra properties
to the <A> element, for the purpose of retrieving them now. Get
the tabberObj object, plus the tab number that was clicked.
*/
var
rVal, /* Return value from the user onclick function */
a, /* element that triggered the onclick event */
self, /* the tabber object */
tabberIndex, /* index of the tab that triggered the event */
onClickArgs; /* args to send the onclick function */
a = this;
if (!a.tabber) { return false; }
self = a.tabber;
tabberIndex = a.tabberIndex;
/* Remove focus from the link because it looks ugly.
I don't know if this is a good idea...
*/
a.blur();
/* If the user specified an onClick function, call it now.
If the function returns false then do not continue.
*/
if (typeof self.onClick == 'function') {
onClickArgs = {'tabber':self, 'index':tabberIndex, 'event':event};
/* IE uses a different way to access the event object */
if (!event) { onClickArgs.event = window.event; }
rVal = self.onClick(onClickArgs);
if (rVal === false) { return false; }
}
self.tabShow(tabberIndex);
return false;
};
tabberObj.prototype.tabHideAll = function()
{
var i; /* counter */
/* Hide all tabs and make all navigation links inactive */
for (i = 0; i < this.tabs.length; i++) {
this.tabHide(i);
}
};
tabberObj.prototype.tabHide = function(tabberIndex)
{
var div;
if (!this.tabs[tabberIndex]) { return false; }
/* Hide a single tab and make its navigation link inactive */
div = this.tabs[tabberIndex].div;
/* Hide the tab contents by adding classTabHide to the div */
if (!div.className.match(this.REclassTabHide)) {
div.className += ' ' + this.classTabHide;
}
this.navClearActive(tabberIndex);
return this;
};
tabberObj.prototype.tabShow = function(tabberIndex)
{
/* Show the tabberIndex tab and hide all the other tabs */
var div;
if (!this.tabs[tabberIndex]) { return false; }
/* Hide all the tabs first */
this.tabHideAll();
/* Get the div that holds this tab */
div = this.tabs[tabberIndex].div;
/* Remove classTabHide from the div */
div.className = div.className.replace(this.REclassTabHide, '');
/* Mark this tab navigation link as "active" */
this.navSetActive(tabberIndex);
/* If the user specified an onTabDisplay function, call it now. */
if (typeof this.onTabDisplay == 'function') {
this.onTabDisplay({'tabber':this, 'index':tabberIndex});
}
return this;
};
tabberObj.prototype.navSetActive = function(tabberIndex)
{
/* Note: this method does *not* enforce the rule
that only one nav item can be active at a time.
*/
/* Set classNavActive for the navigation list item */
this.tabs[tabberIndex].li.className = this.classNavActive;
return this;
};
tabberObj.prototype.navClearActive = function(tabberIndex)
{
/* Note: this method does *not* enforce the rule
that one nav should always be active.
*/
/* Remove classNavActive from the navigation list item */
this.tabs[tabberIndex].li.className = '';
return this;
};
/*==================================================*/
function tabberAutomatic(tabberArgs)
{
/* This function finds all DIV elements in the document where
class=tabber.classMain, then converts them to use the tabber
interface.
tabberArgs = an object to send to "new tabber()"
*/
var
tempObj, /* Temporary tabber object */
divs, /* Array of all divs on the page */
i; /* Loop index */
if (!tabberArgs) { tabberArgs = {}; }
/* Create a tabber object so we can get the value of classMain */
tempObj = new tabberObj(tabberArgs);
/* Find all DIV elements in the document that have class=tabber */
/* First get an array of all DIV elements and loop through them */
divs = document.getElementsByTagName("div");
for (i=0; i < divs.length; i++) {
/* Is this DIV the correct class? */
if (divs[i].className &&
divs[i].className.match(tempObj.REclassMain)) {
/* Now tabify the DIV */
tabberArgs.div = divs[i];
divs[i].tabber = new tabberObj(tabberArgs);
}
}
return this;
}
/*==================================================*/
function tabberAutomaticOnLoad(tabberArgs)
{
/* This function adds tabberAutomatic to the window.onload event,
so it will run after the document has finished loading.
*/
var oldOnLoad;
if (!tabberArgs) { tabberArgs = {}; }
/* Taken from: http://simon.incutio.com/archive/2004/05/26/addLoadEvent */
oldOnLoad = window.onload;
if (typeof window.onload != 'function') {
window.onload = function() {
tabberAutomatic(tabberArgs);
};
} else {
window.onload = function() {
oldOnLoad();
tabberAutomatic(tabberArgs);
};
}
}
/*==================================================*/
/* Run tabberAutomaticOnload() unless the "manualStartup" option was specified */
if (typeof tabberOptions == 'undefined') {
tabberAutomaticOnLoad();
} else {
if (!tabberOptions['manualStartup']) {
tabberAutomaticOnLoad(tabberOptions);
}
}
//]]>
</script>
Note : Host bullet.gif image yourself.

4.Now go to Layout-->Page Element and click on "Add a gadget".
5.Select "html/java script" and add the code given below and click save.
<div id="tab">
<div class="tabber">

<div class="tabbertab">
<h2>Recent Post</h2>
<ul>

ENTER-TAB-1-CONTENT

</ul>
</div>

<div class="tabbertab">
<h2>Recent Comments</h2>

<ul>

ENTER-TAB-2-CONTENT

</ul>
</div>

<div class="tabbertab">
<h2>Archives</h2>
<ul>

ENTER-TAB-3-CONTENT

</ul>
</div>

</div></div>
Note:
Replace ENTER-TAB-1-CONTENT , ENTER-TAB-2-CONTENT , ENTER-TAB-3-CONTENT with your content.
And also you can change Tabs Names.(Red coloured text)
You are done.
Langganan:
Postingan
(
Atom
)