Tampilkan postingan dengan label basic. Tampilkan semua postingan
Senin, 30 Agustus 2010
How To Compatible Blogger Blog With Mobile Phones
If you are using a Blogger Layout Template,this tutorial will helpful for you.But if your template is a blogger template,created by using Blogger Template Designer, usually this feature has already added to your template.This will really helpful to increase the number of mobile visitors of your blog.
Now follow the simple steps given below to ready your blogger blog for mobile phones.
1.Login to your blogger Dashboard--> Design- -> Edit HTML
2.Scroll down to where you see below code:
3.Now copy below code and paste it just before the above line.
4.Now save your template and you are done.
Now follow the simple steps given below to ready your blogger blog for mobile phones.
1.Login to your blogger Dashboard--> Design- -> Edit HTML
2.Scroll down to where you see below code:
<b:include data='blog' name='all-head-content'/>3.Now copy below code and paste it just before the above line.
<meta content='IE=EmulateIE7' http-equiv='X-UA-Compatible'/>
<b:if cond='data:blog.isMobile'>
<meta content='width=device-width,minimum-scale=1.0,maximum-scale=1.0' name='viewport'/>
<b:else/>
<meta content='width=1100' name='viewport'/>
</b:if>
4.Now save your template and you are done.
Kamis, 01 Juli 2010
How To Add Blogger Official Share Buttons
In this tutorial I will explains, how to add blogger new share buttons to your blogspot blog.This will more helpful if your template is a highly customized blogger template.But your template is a blogger default template, then you can add this share buttons editing the Blog Posts widget and enabling Show Share Buttons in Page Elements section.

But this method does not work for you,follow the steps given below to add blogger share buttons to your blog.
1.Login to your blogger dashboard--> layout- -> Edit HTML
2.Click on "Expand Widget Templates"
3.Scroll down to where you see below code:

4.Now Copy below "Blogger Sharing buttons" code and paste it just below the above code.
NOTE: If you can't find <div class='post-header-line-1'/> in your template, paste "Blogger Sharing buttons" code just before <data:post.body/> .
This will show blogger sharing buttons below post header.But if you want to show share buttons below blogger post,then paste your code just after <data:post.body/>.
5.Now save your template and you are done.

But this method does not work for you,follow the steps given below to add blogger share buttons to your blog.
Blogger now offers new share buttons. The new buttons can be placed under each post and let your blog readers easily share your post via email, Blogger, and popular social networks�we now support Google Buzz, Twitter, and Facebook, and we plan to add more services in the future.-From Blogger Buzz
1.Login to your blogger dashboard--> layout- -> Edit HTML
2.Click on "Expand Widget Templates"
3.Scroll down to where you see below code:

<div class='post-header-line-1'/>
4.Now Copy below "Blogger Sharing buttons" code and paste it just below the above code.
NOTE: If you can't find <div class='post-header-line-1'/> in your template, paste "Blogger Sharing buttons" code just before <data:post.body/> .
<b:if cond='data:blog.pageType == "item"'>
<div class='post-share-buttons' style='float:right;margin-right:10px;'>
<b:include data='post' name='shareButtons'/>
</div>
</b:if>
This will show blogger sharing buttons below post header.But if you want to show share buttons below blogger post,then paste your code just after <data:post.body/>.
5.Now save your template and you are done.
Sabtu, 17 April 2010
How To Remove Commentators Profiles/Sites URLs in Blogger
When someone leave a comment,your site is linked automatically into his website or profile url.If you don't like this you can stop it doing this very simple trick.Simply follow the steps below to do it:
1.Login to your blogger dashboard--> layout- -> Edit HTML
2.Click on "Expand Widget Templates".
3.Scroll down to where you see below code:
4.Now replace above code with below code:
5.Save your template and you are done.
Now your site will not linked to commentators sites/profiles.
1.Login to your blogger dashboard--> layout- -> Edit HTML
2.Click on "Expand Widget Templates".
3.Scroll down to where you see below code:
<b:if cond='data:comment.authorUrl'>
<a expr:href='data:comment.authorUrl' rel='nofollow'><data:comment.author/></a>
<b:else/>
<data:comment.author/>
</b:if>
4.Now replace above code with below code:
<data:comment.author/>5.Save your template and you are done.
Now your site will not linked to commentators sites/profiles.
Minggu, 07 Februari 2010
How To Install a Template to Blogger
This tutorial will explain step by step how to install a new blogger template to your blogger blog.
1.Log in to your Blogger Dashboard.
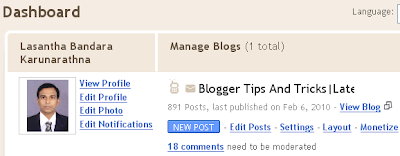
2.Click on "Layout".
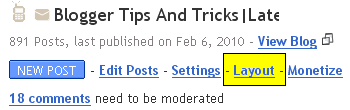
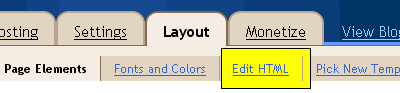
3.Click on "Edit HTML".
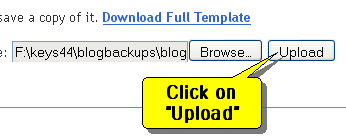
4.Click on "Browse".
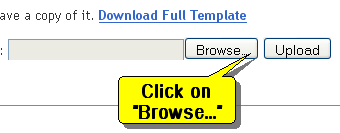
5.Now select your new blogger template file (it there as a xml file) and click on "Open".

6.Click on "Upload".
7.Now confirmation message will appear.Click on "KEEP WIDGETS".

You are done.
1.Log in to your Blogger Dashboard.

2.Click on "Layout".

3.Click on "Edit HTML".

4.Click on "Browse".

5.Now select your new blogger template file (it there as a xml file) and click on "Open".

6.Click on "Upload".

7.Now confirmation message will appear.Click on "KEEP WIDGETS".

You are done.
Senin, 01 Februari 2010
How To Backup Your Blogger Template
To before play with your blogger template you must backup it first.Don't forget to do that if you don't like to face troubles.Read the instruction below to backup your valuable blogger template.
1.Log in to your Blogger Dashboard.
2.Click on "Layout".
3.Click on "Edit HTML".
4.Click on "Download Full Template".
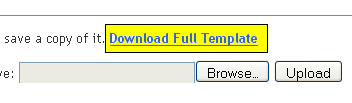
Now you can save your current blogger template to the hard disk.
You are done.
1.Log in to your Blogger Dashboard.
2.Click on "Layout".
3.Click on "Edit HTML".
4.Click on "Download Full Template".

Now you can save your current blogger template to the hard disk.
You are done.
Minggu, 24 Januari 2010
How To Add JS-Kit Rating to Blogger
This is a free Post Rating widget for your blogger blog.It is given by http://js-kit.com/.To add this beautiful Rating widget to your blogspot blog,follow the steps given below.
1.Log in to your dashboard--> layout- -> Edit HTML
2.Click on "Expand Widget Templates"
3.Scroll down to where you see this:

4.Copy one of the code below and paste it immediately after the line <data:post.body/>.
Note : This will add rating widget under your blog post.If you want to add the rating widget under post title, add below code just after <div class='post-header-line-1'/> .
Code 1:
Result:

Code 2:
Result:

5.Now again scroll down to where you see the </body> tag.
6.Add below code just before the </body> tag.
7.Click on "Save Templates" and now you are done.
1.Log in to your dashboard--> layout- -> Edit HTML
2.Click on "Expand Widget Templates"
3.Scroll down to where you see this:

<data:post.body/>
4.Copy one of the code below and paste it immediately after the line <data:post.body/>.
Note : This will add rating widget under your blog post.If you want to add the rating widget under post title, add below code just after <div class='post-header-line-1'/> .
Code 1:
<div style="float:left; margin-right:3px;"></div>
<div class="js-kit-rating"
expr:path="data:post.url"
expr:permalink="data:post.url"
expr:title="data:post.title">
</div>
Result:

Code 2:
<div style="float:left; margin-right:3px;"></div>
<div class="js-kit-rating"
expr:path="data:post.url"
expr:permalink="data:post.url"
expr:title="data:post.title" view="score">
</div>
Result:

5.Now again scroll down to where you see the </body> tag.
6.Add below code just before the </body> tag.
<script src="http://js-kit.com/ratings.js"></script>7.Click on "Save Templates" and now you are done.
Minggu, 27 Desember 2009
How To Remove Post Count From Blog Archive
When you add a blog archive to your blogger blog it shows the number of post for time periods.But if you don't like it, you can remove this post count feature from your blog archive easily.To do it,follow the steps below:

1.Log in to your dashboard--> layout- -> Edit HTML
2.Click on "Expand Widget Templates"
3.Scroll down to where you see your blog archive code:
Note : Your blog archive code will look like this:

4.Now Remove below code from your blog archive code:
Note : You can find it 3 times.
5.Now save your template and you are done.Look at the picture below:


1.Log in to your dashboard--> layout- -> Edit HTML
2.Click on "Expand Widget Templates"
3.Scroll down to where you see your blog archive code:
Note : Your blog archive code will look like this:

<b:widget id='BlogArchive1' locked='false' title='Blog Archive' type='BlogArchive'>
<b:includable id='main'>
<b:if cond='data:title'>
<h2><data:title/></h2>
</b:if>
<div class='widget-content'>
<div id='ArchiveList'>
<div expr:id='data:widget.instanceId + "_ArchiveList"'>
<b:if cond='data:style == "HIERARCHY"'>
<b:include data='data' name='interval'/>
</b:if>
<b:if cond='data:style == "FLAT"'>
<b:include data='data' name='flat'/>
</b:if>
<b:if cond='data:style == "MENU"'>
<b:include data='data' name='menu'/>
</b:if>
</div>
</div>
<b:include name='quickedit'/>
</div>
</b:includable>
<b:includable id='flat' var='data'>
<ul>
<b:loop values='data:data' var='i'>
<li class='archivedate'>
<a expr:href='data:i.url'><data:i.name/></a> (<data:i.post-count/>)
</li>
</b:loop>
</ul>
</b:includable>
<b:includable id='menu' var='data'>
<select expr:id='data:widget.instanceId + "_ArchiveMenu"'>
<option value=''><data:title/></option>
<b:loop values='data:data' var='i'>
<option expr:value='data:i.url'><data:i.name/> (<data:i.post-count/>)</option>
</b:loop>
</select>
</b:includable>
<b:includable id='interval' var='intervalData'>
<b:loop values='data:intervalData' var='i'>
<ul>
<li expr:class='"archivedate " + data:i.expclass'>
<b:include data='i' name='toggle'/>
<a class='post-count-link' expr:href='data:i.url'><data:i.name/></a>
<span class='post-count' dir='ltr'>(<data:i.post-count/>)</span>
<b:if cond='data:i.data'>
<b:include data='i.data' name='interval'/>
</b:if>
<b:if cond='data:i.posts'>
<b:include data='i.posts' name='posts'/>
</b:if>
</li>
</ul>
</b:loop>
</b:includable>
<b:includable id='toggle' var='interval'>
<b:if cond='data:interval.toggleId'>
<b:if cond='data:interval.expclass == "expanded"'>
<a class='toggle' href='javascript:void(0)'>
<span class='zippy toggle-open'>▼ </span>
</a>
<b:else/>
<a class='toggle' href='javascript:void(0)'>
<span class='zippy'>
<b:if cond='data:blog.languageDirection == "rtl"'>
◄ 
<b:else/>
► 
</b:if>
</span>
</a>
</b:if>
</b:if>
</b:includable>
<b:includable id='posts' var='posts'>
<ul class='posts'>
<b:loop values='data:posts' var='i'>
<li><a expr:href='data:i.url'><data:i.title/></a></li>
</b:loop>
</ul>
</b:includable>
</b:widget>
4.Now Remove below code from your blog archive code:
(<data:i.post-count/>)
Note : You can find it 3 times.
5.Now save your template and you are done.Look at the picture below:

Kamis, 17 Desember 2009
How To Add "Follow This Blog" Link to Blogger
This will help other bloggers to follow your blogspot blog easily.To add it under your blog post, follow the steps below.
1.Log in to your dashboard--> layout- -> Edit HTML
2.Click on "Expand Widget Templates"
3.Scroll down to where you see this:

4.Copy below code and paste it just after the line <data:post.body/> .
NOTE:Replace YOUR-BLOG-ID with your real blogger blog ID.

Look at the example below.
Your final result will look like this:
5.Click on "Save Templates" and now you are done.
1.Log in to your dashboard--> layout- -> Edit HTML
2.Click on "Expand Widget Templates"
3.Scroll down to where you see this:
<data:post.body/>
4.Copy below code and paste it just after the line <data:post.body/> .
<p><a href="http://www.blogger.com/follow-blog.g?blogID=YOUR-BLOG-ID" target="_blank">Follow This Blog !!!</a></p>NOTE:Replace YOUR-BLOG-ID with your real blogger blog ID.

Look at the example below.
<p><a href="http://www.blogger.com/follow-blog.g?blogID=1297984091471718670" target="_blank">Follow This Blog !!!</a></p>Your final result will look like this:
5.Click on "Save Templates" and now you are done.
Langganan:
Postingan
(
Atom
)